Showing posts with label White Tip. Show all posts

Wednesday, February 15, 2012

Week 7: "Valentine's Day" Manicure

It's been a long time!!!
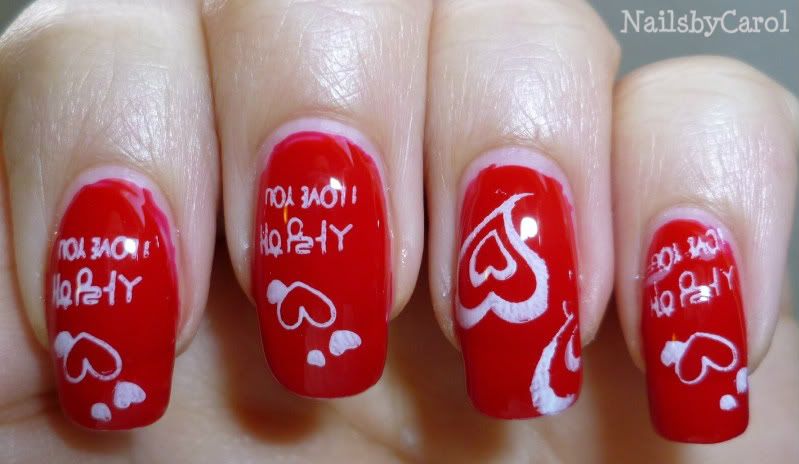
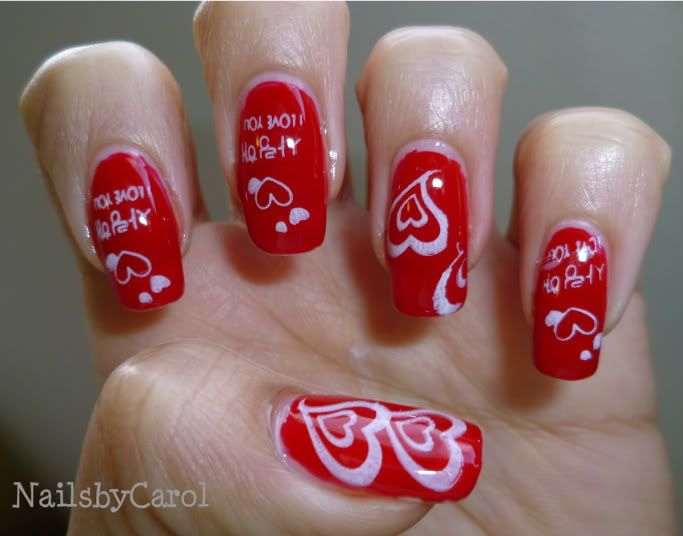
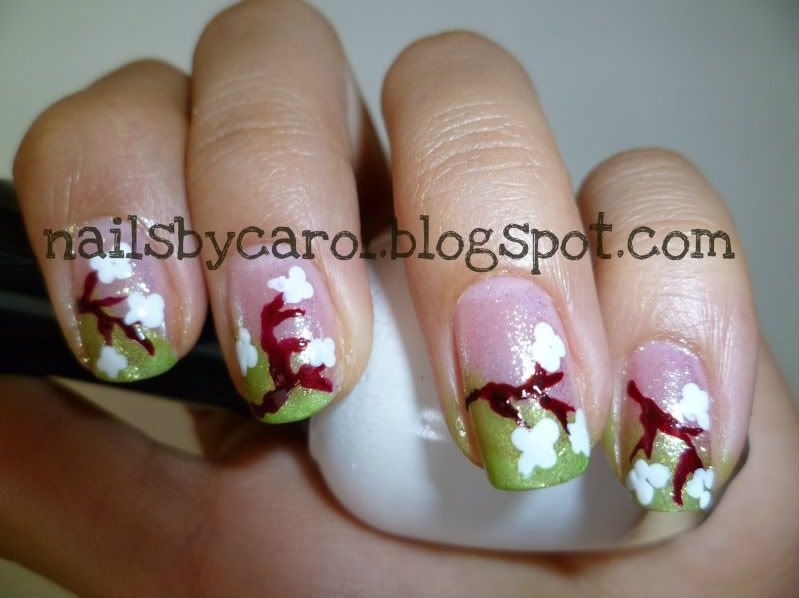
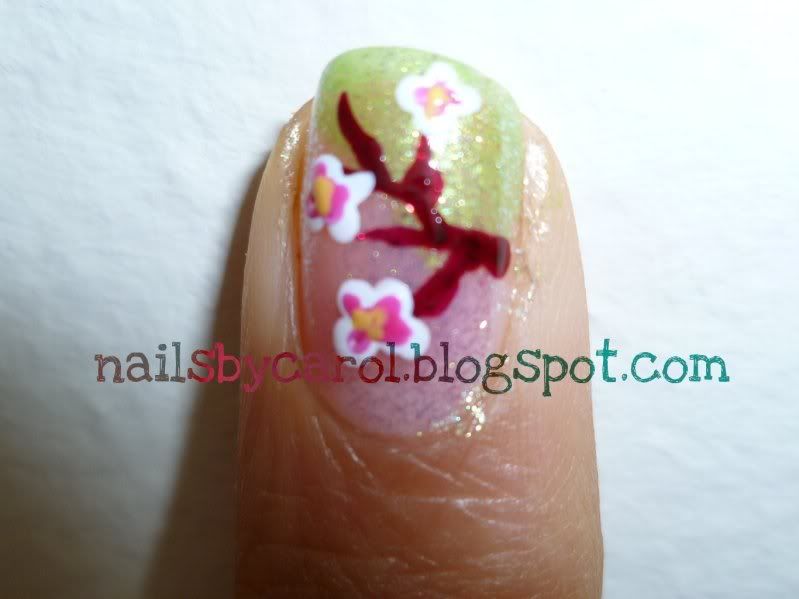
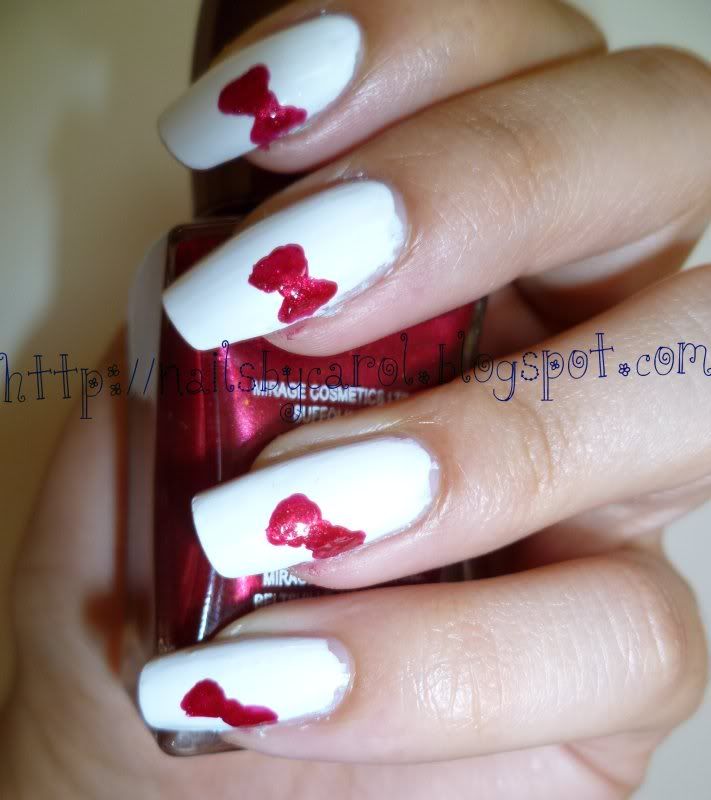
I feel like I haven't posted in ages... This is the manicure I wore for Valentine's Day. I know it is not the best and it is nothing close to what I wanted, but I am adjusting to a new schedule and stuff... I will update you on that. So, I started with 2 coats of 369 by Freshcover, my favorite red ever. This polish is special because it was the shade that made me fall in love with reds :) The stamping was done with SE21 and m19. I used an old Sally Hansen polish in the color White Tip. I decided to give White Tip a chance because it got thick and old, as I said, it is not a perfect mani, but I was okay with the result. Sorry for the rushed post, I promise not to abandon you ladies. I hope you had a great V-Day, much love to all of you!
Hace tiempo no pasaba por acá!
Siento que han sido siglos sin haber publicado algo... Éste es el manicure que usé para el día de San Valentín. Estoy consciente que no es el mejor y que tampoco está nada cerca de lo que deseaba, pero me estoy ajustando a un nuevo horario y a otras cosas... Les traeré una entrada acerca de eso próximamente. Empecé con
2 capas del color 369 de Freschover, mi rojo favorito. Éste esmalte es especial para mi porque fue el que me hizo enamorarme de los rojos. El estampado lo hice con los platillos SE21 y m19. Usé el esmalte blanco de Sally Hansen llamado White Tip. Lo usé porque es un esmalte viejo que ya se puso espeso y pues me convenció como quedó. Perdón por la publicación tan apresurada, prometo no abandonarlas. Espero hayan tenido un lindo día de San Valentín, mucho amor para todas!
For a list of the previous and upcoming manicures, as well as the other ladies doing it, please click HERE.  
xoxo,
Carol

Pin It

Tuesday, September 27, 2011

Flowers, Dots and Glitter

Hi!
This nail look came to me as an improvisation because, just as anytime, I do not know what to do. So here we go. Before getting into the tutorial itself, I would like to mention that many times I do not post detailed step-by-step pictures, that is because many times I start doing my nails and I get too focused and it is until I am basically done that I say, "Hmm, PICTURES!!!!". I think I will be doing this look again and I promise I will take pics this time around.
Hola!
Éste manicure salió de una improvisación porque como siempre, no sabía que hacer. Aquí vamos. Antes de iniciar el tutorial, me gustaría mencionar que muchas veces to coloco fotos detalladas del paso a paso, eso es porque muchas veces cuando arreglo mis uñas, me enfoco mucho en lo que hago y no es sino hasta que he terminado que me doy cuenta que no he tomado fotos. Haré nuevamente este manicure en otra oportunidad, prometo tomar fotos esta vez.

Start with two coats of Gorgeous by Sinful Colors, a green-turquoise polish with some iridescence.
Empieza con dos capas de Gorgeous de Sinful Colors, que es un verde turquesa tornasol.
Then, do a diagonal with silver and do little half circles to resemble lace.
Traza una diagonal con plateado y haz medias lunas para que parezca encaje.

On one of the corners, do a 4-petaled flower and add some random dots.
En una de las esquinas, haz una flor de 4 pétalos y agrega puntos al azar.

Seal it off with a top coat.
Séllalo con un protector de esmalte.
-Carol
Pin It

Wednesday, September 14, 2011

Silver and Dots

Hi Again!
I gave Kleancolor polishes a try and I was a little skeptical after my crackle polish experiment (link to post). The polish I used is called Pearl Silver and it is a beautiful shade with lots of shimmer and it is a million times better than the crackle polishes. I used two coats of that and then I just did some random black and white dots. Nothing special. I hope you like it! By the way, my nails have grown, and this design will work on either long or short nails.
Hola de nuevo!
Le dí una oportunidad a los esmaltes de Kleancolor y honestamente, estaba un poquito insegura después de haber hecho mi experimento con los esmaltes que se agrietan (enlace aquí para el experimento). El esmalte que usé hoy se llama Pearl Silver de Kleancolor y es un color muy bonito con mucho brillo y es un millón de veces mejor que el esmalte que se agrieta. Utilicé dos capas de éste y luego solo agregué unos puntos en blanco y negro. Nada especial, espero que les guste! Por cierto, mis uñas han crecido, pero aún asi, este diseño luce bien en uñas cortas o largas.
 -Carol


Pin It

Monday, September 12, 2011

Sakura: Cherry Blossoms

This time I will show you my attempt to create a nice and feminine manicure featuring cherry blossoms. I personally love it, and although it is not perfect, I really liked how it came out.
En ésta ocasión les mostraré mi intento para crear un manicure lindo y femenino con flores de cerezo. Personalmente me gustó mucho, aunque se que no es perfecto, me agrada el resultado que obtuve.

1.Start with a coat of a shimmery color of your choice (Fire Fly by Jesse's Girl)
Empieza con una capa de esmalte brillante en el color de tu preferencia (Fire Fly de Jesse's Girl)

2.Add some green to 1/3 of your nail using a cosmetic sponge (Happy Ending by Sinful Colors)
Agrega verde a 1/3 de la uña usando una esponja de maquillaje (Happy Ending de Sinful Colors)

3. Draw branches with a dark burgundy/brown polish (Lincoln Center by NYC)
Dibuja ramas usando un color corinto o café (Lincoln Center de NYC)

4. Using your dotting tool and a white nail polish (White by Kleancolor) create 3-4 petaled flowers.
Con un punteador y usando un esmalte blanco (White de Kleancolor) haz flores de 3-4 pétalos.

5. Add dimension to the flowers by adding some pink and yellow in the middle (Expecting by Freshcover y Mellow Yellow by Sally Hansen Hard as Nails Xtreme Wear).
Dale dimensión a las flores con un poco de rosado y amarillo (Expecting de Freshcover y Mellow Yellow de Sally Hansen Hard as Nails Xtreme Wear). 

6. Add a top coat.
Aplica un sellador de esmalte.

Luv' ya!
-Carol
Pin It

Wednesday, July 20, 2011

Konad: French Stars

您好

Welcome back!
After my crackle polish experiment (link here) I had to do my nails once again. Ever since I have been growing them, I do not like to see them bare, I feel like there is no point on doing that.
Bienvenid@as nuevamente! 
Después de mi experimento con esmaltes crackle (enlace aquí) tuve que arreglar mis uñas otra vez. Desde que he dejado crecer mis uñas no me gusta verlas sin esmalte, siento que no tiene chiste hacer eso.

Products used:
Productos utilizados:
  • Glass Pink by Sinful Colors 
  • White Tip by Sally Hansen
  • Black Créme by Wet n Wild
  • Konad White Special Polish 
  • Konad m3 plate (I got this picture from a website, it is not mine)
1. Apply 1 coat of a light pink (Glass Pink)
Aplica 1 capa de un rosado pálido (Glass Pink)

2. Do a French tip with the color(s) of your choice (White Tip and Black Créme)
Haz un francés con color(es) de tu preferencia (White Tip y Black Créme)

3. Stamp over the tip with one of the designs on the plate. I used the Konad polish in white but for the black stars, I used the nail polish from WnW which worked fine.
Coloca un sello sobre el francés que hiciste. Yo usé el esmalte blanco de Konad pero para las estrellas negras, utilicé el negro de WnW el cual funcionó bien.

4. Apply a top coat. The end.
Aplica un protector. Y ya!

xoxo, 
Carol
Pin It

Tuesday, July 12, 2011

Butterfly Wings

Ciao!

Today I did 2 manicures. The first one turned out really ugly and uninspired so I had to do my nails again. I was not finding inspiration, so I started looking up different nail designs on YouTube and on different blogs I follow. I came across one that had butterfly wings and it was beautiful; I just had to recreate it. As I kept looking, I realized many people have the same design so this was not my idea, I don't know whose idea it was. What matters is that I took off the ugly manicure I had at the beginning.

El día de hoy me hice dos manicures. El primero me pareció feo y sin inspiración, así que me lo quité. No encontraba nada nuevo que hacerme, así que opté por buscar algo en YouTube y en los blogs que sigo. Encontré uno que tenía alas de mariposa, era muy lindo y sentí la necesidad de hacerlo. Seguí buscando más diseños similares y me dí cuenta que ya varias personas tenían el mismo patrón de líneas y diseño, por eso no sé de quién es la idea inicialmente. Lo que importa es que me quité el diseño horrible que me hice antes.

Products used:
Productos utilizados:
  • Base and Top Coats
  • Psychedelic by LA Girls Disco Brites
  • PA12 Black by Kiss Brush On Nail Art
  • Black Expressionism by Finger Paints
  • 07 White Tip by Sally Hansen
1. Apply 2 coats of yellow nail polish (Psychedelic).
Empieza con dos capas de esmalte amarillo (Psychedelic).


2. Start doing a pattern with a black nail art polish (it doesn't need to be like this).
Continúa con un patrón de líneas en color negro (no tiene que ser así como este).
 
This will be your skeleton -well, the beginning of the wing ;) .
Ésto será tu esqueleto - bueno, será el inicio del ala ;) .

3. Fill out the tip with black polish.
Rellena la punta con un esmalte negro.

4. Dot the tip with white.
Haz puntitos blancos en la punta.


5. The end!
Terminamos!

 -Carol
Pin It

Thursday, June 30, 2011

Hello Kitty Nails

Products Used:
Productos Utilizados:

  • White Tip by Sally Hansen Hard As Nails
  • 839 by Freshcover
  • Psychedelic by LA Girls Disco Brites
  • Black by Kiss Brush On Nail Art
  • Acrylic Strong Top Coat by Nailene
1. Start with 2 coats of white nail polish.
Inicia con 2 capas de esmalte blanco.
  
2. With a red nail polish  draw a slanted bow on one side of your nail.
Con un esmalte rojo, dibuja un moñito en uno de los lados de la uña.

3. Draw a tiny oval in yellow. Make sure it's not too big or too close to the bow.
Con amarillo, dibuja un óvalo pequeño. Asegúrate que no sea tan grande o tan cerca del moñito.

4.  With black nail polish, draw the eyes and whiskers.
Dibuja los ojos y bigotes con esmalte negro.


5. Add a top coat. The end!
Optional: Add a small french in yellow if you have the space.
Aplica protector. Listo!
Opcional: Agrega un francés amarillo si tienes el espacio.


-Carol
Pin It

Sunday, June 26, 2011

Pedicure: Simple is Better

I don't usually give myself pedicures, miraculously, I was in a good mood today so I did it. It's nothing fancy, just a simple french pedicure with some decorations in black and white. I really love it and it didn't take me a long time.
Casi no acostumbro hacerme pedicures, pero milagrosamente, hoy amanecí de buenas y me hice uno. No es nada del otro mundo, es un simple pedicure francés con algunas decoraciones en blanco y negro. Realmente me gustó mucho y no me tarde tanto tiempo haciéndolo. 


Products used:
Productos utilizados:
  • White Tip by Sally Hansen Hard As Nails
  • Black by Kiss Brush on Nail Art  
  • Base coat and Top Coat  (Endurecedor y Protector de esmalte)
-Carol
Pin It

Tuesday, June 21, 2011

Special Occasion/Fancy Nails

Products Used:
  1. Diamond Strength Nail Hardener by Sally Hansen
  2. Glass Pink by Sinful Colors
  3. Black by Kiss Brush on Nail Art
  4. Black Expressionism by Finger Paints
  5. White Tip by Sally Hansen Hard as Nails
  6. Expecting by Freshcover
  7. Dotting Tool by Amazing Shine
  8. Rhinestone Wheel by Adoro
  9. Acrylic Strong Top coat by Nailene 

"French tip" with Black

Add rhinestones on ring finger

Add white and pink dots along the edge


The end!

-Carol
Pin It