Thursday, August 8, 2013

Flowers and Special Guest

Here kitty, kitty!
One thing I might have not mentioned before is that I am a huge animal lover. Canines, felines, rodents... You name it, I love it. This is Tarzan and here is a little story about him. One afternoon, he was just standing at my door waiting for someone to come out. My brother saw him and started feeding him chicken. He came in and let us pet him and then he took off. Next day, there he was again... We fed him and gave him some milk. He let us pet him again, came into the house and then he left. On a third occasion, same thing happened but this time his eye was almost bleeding. At this point we were sure he was a stray cat and I felt so bad for him; he looked miserable. We fed him again and he left. Two weeks after, my brother saw a cat that had been run over close to one block from our house. We thought it had been Tarzan. About three months after that, guess who showed up? It was Tarzan! This time, he had gained weight, his fur was healthy and shiny, his eyes looked bluer than ever... Just a beautiful cat. He came into the house and this time he did not want to eat or drink anything; he just wanted love.
Well, we didn't take him in because we found out that Tarzan's name is Blue and he is our neighbors' cat! Yup, right next door... Sneaky cat! We still call him Tarzan though and I am really happy he is not a stray cat :)
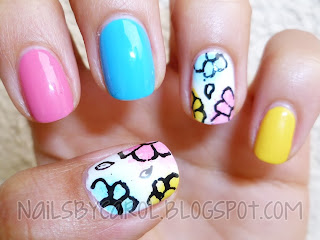
For my nails, yeah, this is a nail blog after all... I did a French manicure using OPI Fair Dinkum Pinkum as a base and OPI Cha-Ching Cherry for the tips. The details are just black and white acrylic paint.


Meow!

Pin It

Thursday, August 1, 2013

A cutepolish Design - Doodle Flowers

One of the things I love about the nail polish community is that you can try the different manicures you see and then you realize how doable those tutorials and techniques really are. I am not ashamed to share a manicure which I saw on someone's blog or YT tutorial; in fact, I have shared a number of them now. I am pretty sure you know who cutepolish is... If not, well, you should check her out! Here is a manicure I copied from her, I just loved it and I got many compliments on it:


Here is the original video tutorial:
xoxo!
Pin It

Friday, July 26, 2013

Disney's California Adventure!

Hello :)
Although I have not told you the horror story of my peeling nails, I did this manicure when they were getting back in shape. I went to Disney's California Adventure the last Friday of June and it was amazing! I hadn't been there in about 5 years and I enjoyed every minute of it - except the long lines for some rides. The picture above is from the end of the World of Color show on water. If you have watched it, I am sure you are just in awe as I am. It is such a show, worth every penny; it even made me cry...
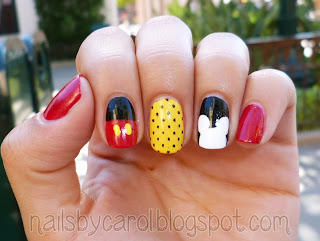
On to the nails... I googled Disney nail art and I just copied this manicure which came up several times. I did not take more pictures because I had a topcoat issue and sheet marks- ugh! but I really liked it. I took the picture before the Pixar parade.
What is your favorite Disney character???
Polishes:
-Red: China Glaze Ruby Pumps
-Black: Finger Paints Black Expressionism
-Yellow: Sally Hansen Insta-Dri Lightening 
-White: acrylic paint
-Dots: essence stamping plate Pin It

Tuesday, July 23, 2013

Review for KK CenterHK: Light Pink 2mm Circular Studs


Hello :)
I have an exciting post for you guys and girls. I meant to have it ready a couple of weeks ago but it turns out that my nails were dying- I am talking about extreme peeling, chipping and some other horrors that I will get to in a separate post.
KKCenterHK was kind enough to allow me to choose one item for review and I picked their light pink 2mm circular studs. -Thank you very much! (Please be ready to see MANY pictures)
 
I have seen many studded nails and I have read many reviews. However, here are my first impressions and some info (prior to using the studs):
  • The ~50 piece package is $4.73
  • The package arrived in good condition, very well protected with bubble wrap 
  • The studs are very shiny, lightweight and nicely pigmented
  • The backing is hollow, which turned out to be helpful
Here is the manicure I used to show of the studs:
Polishes: Jenna Hipp The Freshmaker (mint) and Damage Control (pink)
 
 I used the studs like I used any other 3D decoration. I used a non-fast drying top coat as glue and they held up perfectly. They lasted longer on my nails than the polish itself. As you see, I placed them on the nails with the minty green polish because they would create a nice contrast since the studs are light pink. I am impressed on how 3 tiny studs can completely change and improve a plain manicure.


I apologize for these awkward pictures, the purpose is for you to see how they were on my nail, I am not pointing at you, that's rude.
 

My final thoughts and recommendations:
  • The 2mm size is perfect for my narrow and curved nails, I am sure they can fit beautifully other nail shapes and lengths.
  • The studs are not bulky at all yet they give that three-dimensional feel which is quite nice.
  • The color does not bleed. However, if the topcoat protecting the stud undergoes friction, it is highly likely that the studs will show some wear.
  • They are easy to use, they are not heavy and they can accessorize any type of manicure.
  • I love them!
For being so kind and reading my entire post, here is a 10% off bonus courtesy of KKCenterHK for your next purchase:
 
* Product sent for honest-review consideration *


Pin It

Monday, July 1, 2013

Purple-Blue Gradient and Flowers

Hello :)

It's Hot in California! That should be a show... If you have watched the weather news, you might have seen that we are sweating like crazy here in the Golden State. Although I enjoy not having to wear boots or long sleeves, I don't like being sweaty and oily all day and night.
Today's manicure came about as a test for my birthday manicure... I liked it a bit, but in my eyes it's not birthday worthy. Maybe I would do the same thing but with reds and oranges. I will keep you updated if I optimize it :)


Pin It

Saturday, June 15, 2013

Chevrons and Glitter and Bows. Oh, my!

Hi everyone!
I'm sorry I have been so MIA but life happens... along with my nails peeling like crazy. I had to file them down and they have stopped peeling but now, I have to grow them out and make sure they are healthy again.
I have seen so many mixed manicures lately, especially from Marta from the blog ChitChatNails.com. I tried to do a skittlette as she called it, but I was just picking random polishes and stamps. Well, here is the end result.
Base (Pink) - Sinful Colors Cream Pink
Holo Glitter - B Touch Multisilver G
Glitter (Pink) - Jordana Magenta Magic
Stamps - Bow m59, Chevrons BM 201


Pin It

Tuesday, May 21, 2013

Water Decal Nail Stickers - A Review for BornPrettyStore (Plus Discount Code)

Hello dear readers!
This manicure that I am showing you in this post is featuring some Water Decals Nail Art Stickers which were provided to me by BornPrettyStore.

There are 12 pieces in this set and it comes with a small nail file. There are directions in the back of the package showing the process of the decal application.

12pcs Cute Design Water Decals Nail Art Stickers Decoration Manicure - 24 patterns


So here is what I came up with:
I know there are written directions in the package as well as on the website; however, this is what I did with the product:
  1. Align the nail with the decal and choose the best size (width) for your nail.
  2. Cut the desired decal - I had to size them down a little because my nail beds are narrow and I had to crop the decals so they would fit my nail.
  3. Dip in water for 10-15 seconds.
  4. Remove the thin, plastic decal from the paper backing and place it on your dry nail - make sure the decal is not soaked in water prior to placing it on your nail.
  5. Once the decal dries on the nail, file the excess off and make sure you have smooth edges. Be careful not to file your nail along with the decal.
  6. Apply a top coat.
 I applied 3 decals on my nails and I chose a pink polish to pull the manicure together. Here is a full hand picture:
 I zoomed in into my thumbnail so you could appreciate the amount of detail in these kawaii popsicles:
 So now the review:

Pros:
  • There are 12 pieces per package at a very good price ($1.99)
  • They are easy to use and there is no messy application - NO smell, glue, scraping, waiting time, etc.
  • BornPrettyStore offers 24 different patterns for these decals; the combinations are very many.
Cons: 
  • I had to manually size the decals to fit my nails (which took a couple of minutes)
Overall, I am very pleased with these decals. I really love this manicure and it has lasted me over 3 days, which is remarkable. I would definitely recommend you to try these for those days when we don't have time for stamping, sponging, and such artsy activities.

The direct link to these decals is here and the store link is here.

And if that's not enough, BPS provided me with a 10% off coupon for my lovely readers, use it at the time of purchase:
http://www.bornprettystore.com
Let me know if you use these decals :)

Thanks for reading!

* Product sent for honest-review consideration *
Pin It

Thursday, May 9, 2013

I Tried...

Hola amigas!
I have been neglecting my blog, as usual, but I had been busy and stressed out about a few things - good things. I don't want to get into too many details because I don't want to jinx it, but I am extremely happy :D Hmm, just in case, I didn't get engaged, I am not getting married, and I am not pregnant... Just saying!
Moving on to my nails, I have been practicing my free-handed strokes and swirls and all that... It's not my forte. I saw THIS tutorial in the blog It's all about nails by Radi. I did it a bit differently but it is totally her design. It is obvious, I need to practice more!


Pin It

Monday, April 29, 2013

Rainbow Leopard Print

Hello there!
I don't think I need to say much about this manicure given that it is not a novelty in the nail polish world. I love animal print and I love rainbows! I just loved this manicure which lasted on me for about 5 days. I got so many compliments on it, I swear, when I don't want people to notice my nails they compliment them the most... Who am I kidding?! I really like it when people compliment my nails :D


Pin It